Import & export contacts
Importing your contacts
With Prezly's Contacts feature, you can easily import hundreds (or even thousands) of contacts in one upload by using a CSV or Excel file.
There are several ways you can add contacts to your Prezly account:
- Import an Excel/CSV file
- Copy and paste from a spreadsheet

You can also add contacts individually by going to Contacts and clicking Create contact.
Import a CSV/Excel file
Before you start importing contacts from your Excel or CSV file, you must first format it in a way that our system can recognize each field or piece of information about your contact.
You can use this downloadable Excel template to get your contacts into Prezly:
Download Excel template for contact importCopy & paste from a spreadsheet
You can also quickly copy and paste your contacts from a spreadsheet to the Prezly contact importer.
- Open the spreadsheet of contacts you want to add to Prezly
- Select all the contact data you want to import, including column headings
- Copy the selected information (cmd+c on Mac, ctrl+c in Windows, or right-click and select "copy")
- Open the Prezly importer
- Paste the information into the window (cmd+v on Mac, ctrl+v in Windows, or right-click and select "paste")
We recommend importing a CSV or Excel file for larger contact lists.
Import contacts from email client
If you need to export your contacts from a mail client:
- Outlook: Learn how to export your Outlook contacts to Excel with all the information using this tutorial
- Gmail: Learn how to export your Gmail contacts to CSV with all the information using this tutorial. ⚠️ Use "Outlook CSV" format.
Preparing your CSV/Excel file for import
1. Use a single sheet
All contacts should be in a single sheet, which means not adding different contact lists in different tabs within the Excel or CSV file. Prezly will only recognize a single-sheet file.
2. Remove any subdivisions
Remove rows that are just sub-headers instead of real contact information.

3. One item per cell
This is especially important for email addresses and phone numbers. We often see spreadsheets in which multiple addresses are gathered in one cell, like this:

It's better to split this information into separate cells like the below:

… or to separate each email address with a comma:

4. All columns must have a header
Add a header row to specify the types of information contained in each column.
5. Separate tags with commas
When adding more than one tag to your contacts, make sure that the tags are separated by commas in each cell (eg. Tag 1, Tag 2, Tag3).

Supported contact fields
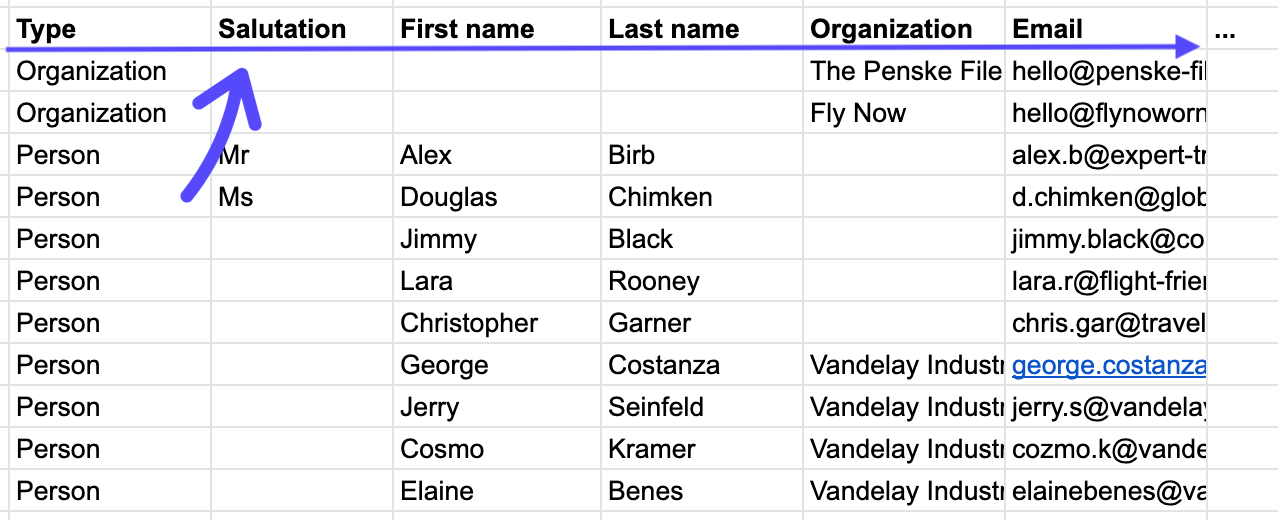
Each column in the importing file represents information about your contact, such as Type, First name, Last name, Organization, Email, etc.
These are the contact fields you can currently import into Prezly:
Field | Note |
|---|---|
Type | define whether the contact is a "person" or and "organization" |
Organization | where the person contact works. If a contact works at multiple organizations, use a comma separated list in one cell, e.g. Vogue, Wired, NYT. This will automatically link the person to that organization in your database. If this organization doesn't exist yet in your database, it will be automatically created |
First name | Leave this field empty if the contact is an organization |
Last name | Leave this field empty if the contact is an organization |
Full name | Optional: if you don't have a first and last name column you can import contacts with a full name in one column. Prezly will then automatically try to distinguish between first and last name when importing. However, it is recommended to use separate first and last name columns if possible |
Function | the contact's function or title within their organization, e.g. Editor |
the contact's primary email address; you can include up to 9 emails per contact, separated by a comma or entered as separate columns | |
Telephone |
|
Mobile |
|
Street, Number, Box |
|
Zip/Post code |
|
City/Town |
|
County/Region |
|
Country |
|
Tags | any tags you want to assign to a contact to help categorize them in your CRM. If you have multiple tags for a contact, add them in a comma separated list in one cell, e.g. "lifestyle, beauty, design" |
Comment/Note | text only; this attaches a note on the contact |
Language | you can include a two-letter short code for the language the contact speaks; include multiple languages by separating each short code with a comma, e.g. en, nl, de... |
Media type | Choose a media type for your contact from the following: analyst, blog, expert, influencer, magazine, news website, newsletter, newspaper, photo, podcast, print, radio, social, tv, vlog, web, or wire. If a contact has more than one media type, use a comma-separated list in one cell, e.g. print, radio, tv |
Periodicity | you can pick one periodicity per contact out of these options: daily, bi-weekly, weekly, bi-monthly, monthly, quarterly, bi-annually, or annually |
Gender |
|
Domain identifier | Only for organization contacts. This should be a link to the main company website, and helps Prezly to automatically fill in the contact with additional data. |
Website | if a contact has multiple websites, add the websites in a comma separated list |
X (Twitter) | username; it's not necessary to write the @ sign before the username |
username | |
username | |
username | |
username | |
YouTube | username |
Discord | username |
Twitch | username |
Skype | username |
Snapchat | username |
Salutation | you can also define a contact salutation, such as Mr or Mrs; this will allow you to automatically insert the salutation into campaigns and pitches |
During import
The import process gives you the opportunity to clean up your contact list as it is imported into Prezly, creating a solid foundation for your media database.
Match header rows with contact fields

After uploading or pasting the data from a file, our importer automatically matches the header columns it recognizes from your file with a corresponding contact field in Prezly. When it isn't able to recognize a header column by its name, these will have to be mapped manually on your end.
Need to change the selected header column? No problem – you can do this by clicking on the pencil icon in the table header.
Some contact fields clash with others.
For example, if you have mapped a column to Full name, mapping another column to First name will mark these fields as incompatible, since a contact can't have two first names.
Your table may contain headers that simply do not match any available field in Prezly. Don't be afraid to uncheck Import this column if that is the case!
Import summary
When an import is complete, you'll see a summary of the import, where you can view a list of imported contacts, add tags to them, or create a campaign especially for those contacts.
If you re-import existing contacts without any updated data, these contacts will not be considered as "newly imported" and will not be accounted for in the import summary.
In some cases, contacts are not imported due to invalid field data. This can easily be fixed by clicking on Resolve issues to complete the import on the summary screen. Then, you can resolve the issue(s) by correcting the invalid values for each field.
If you uncheck the "Import" checkbox, this value won't be imported.
Note: Contacts can't be partially imported, so if at least one field belonging to a specific contact is unresolved, this contact as a whole will not be imported. To ensure a complete import, make sure all invalid fields are resolved.
Link person contacts to organization contacts
If you didn't already link all person contacts to organizations in your import spreadsheet, you will have the possibility to do this after the import is completed:

After import
Using the "Import" filters
You can use Prezly's "Import" filters within contact segments
Prezly has three stable filters for sorting contacts based on when they were imported into the system:
- Created by Import — all new contacts that were created as a result of a specific import
- Updated by Import — all contacts that were updated as a result of running a specific import
- Affected by Import — all contacts that were created or updated as a result of running a specific import
Because these filters are stable, the contacts they target will not change when you import another spreadsheet. This means you can safely use them to build Segments targeting the audience you want.
What happens if I re-import a deleted or existing contact?
How Prezly manages information from deleted and existing contacts.
Re-importing deleted contacts
When re-importing a previously deleted contact, the only contact attribute that Prezly will recall when re-importing is their mailing preferences.
Mailing preferences include whether your contact is Unsubscribed from one or more sites, if they are Subscribed, or if their email address has Bounced or was invalid, etc.

What does it mean when contacts are "Unsubscribed"?
While Prezly recalls a deleted contact's mailing preferences, other attributes are lost when deleting a contact. This means that only newly uploaded information will exist for the contact going forward.
Contact details including contact notes, activity, avatar images, and tags, are lost upon deletion. The newly imported contact will only contain these details if they are included in the import file. Otherwise, they will need to be manually added again.
Re-importing existing contacts
Whenever you import contacts that already exist in your contacts database, Prezly will automatically update the existing contacts with the new information entered in your spreadsheet or when you create an individual contact.
If the contact(s) in your file do not have any new data compared to the existing contact data, this contact will not be imported. This means that it will not be counted in the import summary, and you will not be able to filter search for this contact based on the import.
If the import resulted in undesired contact updates, contact support (support@prezly.com) and we can help you restore the previous contact data.
You can see which contacts were created during which import by using the contact filter Import, or by going to the https://rock.prezly.com/imports
Updating your contact information by re-importing your contact list
You can also use the contact importer to update contact information for contacts already in your Prezly database. This can be helpful if you're looking to make many changes to a lot of your contacts at once.
- Find and select the contacts you wish to update, then export them
- Once exported, use the spreadsheet to add or edit the data you wish to update
- When the spreadsheet is updated, save it as a CSV or .xls file, and start a new import on Prezly's Contacts page by clicking the Import contacts button. The existing contacts will be automatically updated and you can check each contact's activity tab to see details of which fields were updated by the import
The following fields can be overwritten through a re-import:
- Type
- First name
- Last name
- Full name
- Function
- Gender
- Street/Number/Box
- Zip code
- City
- Region
- Country
- Youtube
- Snapchat
- Periodicity
- Salutation
The following fields cannot be overwritten through a re-import, as they can have more than one value:
- Organization
- Language
- Telephone
- Mobile
- Website
- Comment
- Tags
- Media type
Please note that it isn't possible to delete contact data through a re-import. Re-importing existing contacts only adds new contact data or overwrites existing data.
Exporting contacts from Prezly
We recommend exporting your contacts from Prezly to an excel file so you can safeguard your contacts list on an external storage service. The export file will contain all contact fields, so you don't have to worry about any missing contact information in the exported file.
Prezly will also send you a notification email letting you know once the contact export is complete.
Pro Tip: The information provided in the export can help you deliver on Privacy Requests as per the GDPR.
Exporting your entire contact list
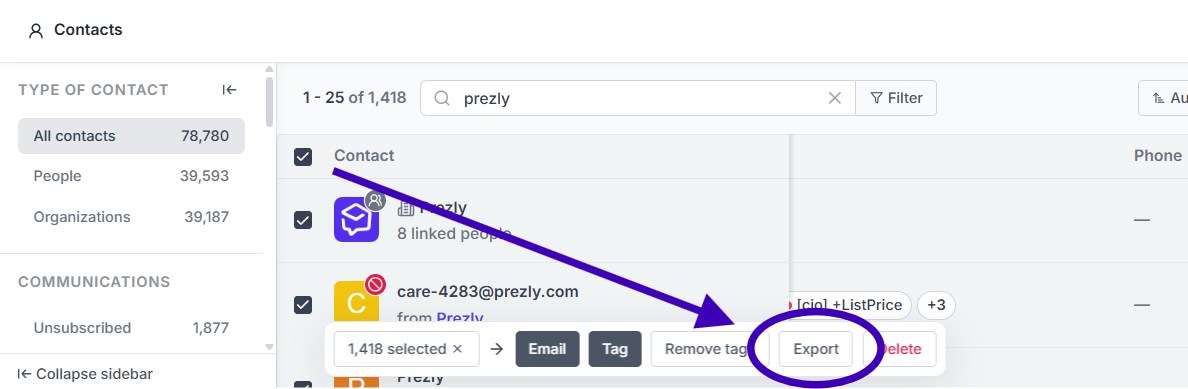
- On the Contacts page, click on "All contacts" to see the full list of contacts in your database
- Click on the checkbox at the top of the table to select the entire list
- Once selected, a pop-up menu with more options will appear at the bottom of the screen. Click on the Export button to begin the process
Export a subset of your contacts
You can use the Filter on the Contacts page or use a view to find specific contacts to export. Once you have that specific contact list you want to remove, again, click on the checkbox at the top to select the entire list, then go to the pop-up menu at the bottom of the screen and then click on Export.

Export a single contact
You can also export a single contact from the Contact preview or Contact profile page.
- Visit the contact you would like to export
- Click on the "•••" button
- Select Export contact data

Your account export history
You can access your account export history through the sidebar by clicking Contact exports under the More expanded menu, or by going to https://rock.prezly.com/settings/contact-exports.
This page shows the date and the team member who performed each export, and allows you to re-download previous contact exports.
If you have any questions regarding contact uploads, contact us at support@prezly.com or send us a message by clicking the purple circle in the corner!